Step 1. Let's run the system!
First of all you need to choose target microcontroller, that you want to flash. The list of supported targets you can find in the system release notes. In the example we will use STM32F7 Discovery Board with embedded stm32f746ngh6 microcontroller featuring 1 MB of Flash and 340 KB RAM. More informations about the board you can find at this link.

STM32F7 Discovery Board
In this example we will use UART to connect the system with PC. This is the most basic way supported from version V.0.4.0. For this reason you will need an UART converter such as (you can buy it e.x. at THIS LINK):
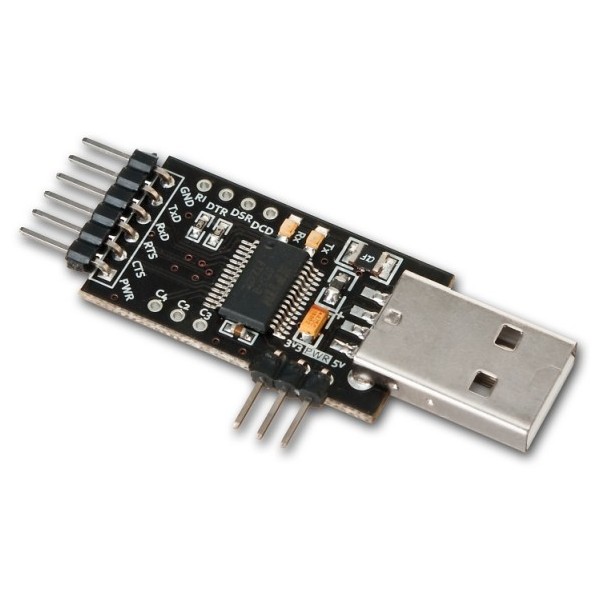
UART Converter
Moreover you have to get the system source code. You can do it by download the latest release version from the ChocoOS.pl site or by cloning the ChocoOS repository:
git clone git@bitbucket.org:chocos/chocos.git
Windows
When you have the sources, you should open command prompt and open a Source directory in it. Now use select_arch.bat script to select target architecture, that you want to use. In our example we have to select stm32f746ngh6 architecture:
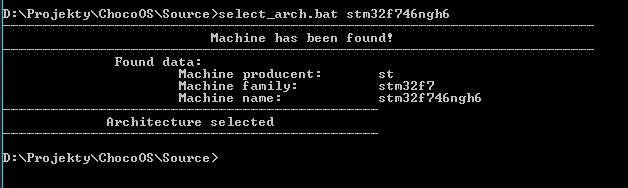
Architecture Selection
Now you are able to compile the project. To do it, just run build.bat script:
When the build will finish with success you should get the following message:
All resultant files are stored in the Output directory created in the main system dir (ChocoOS/Output). It can be useful for you if you want to manually flash the microcontroller - you can find there compiled project in formats: HEX, ELF and BIN.
The system by default is prepared for handling most popular boards - thanks to that in our case we can just use script connect.bat for connection with the debugger embedded in the board. The script will open command prompt in new window, and if everything will be success, we will see following screen:
It is very likely, that when you will connect the Discovery Board for the first time, you will need to install USB drivers first. You can download them from the ST page.
- Note
- The ChocoOS uses OpenOCD to connect and flash a microcontroller. If it does not work correctly, you can try to find an answer in the official OpenOCD page: openocd.org
To write system image into the chip flash memory you use script flash.bat. Remember, that the connection window should be still open during this operation, just like in the example below:
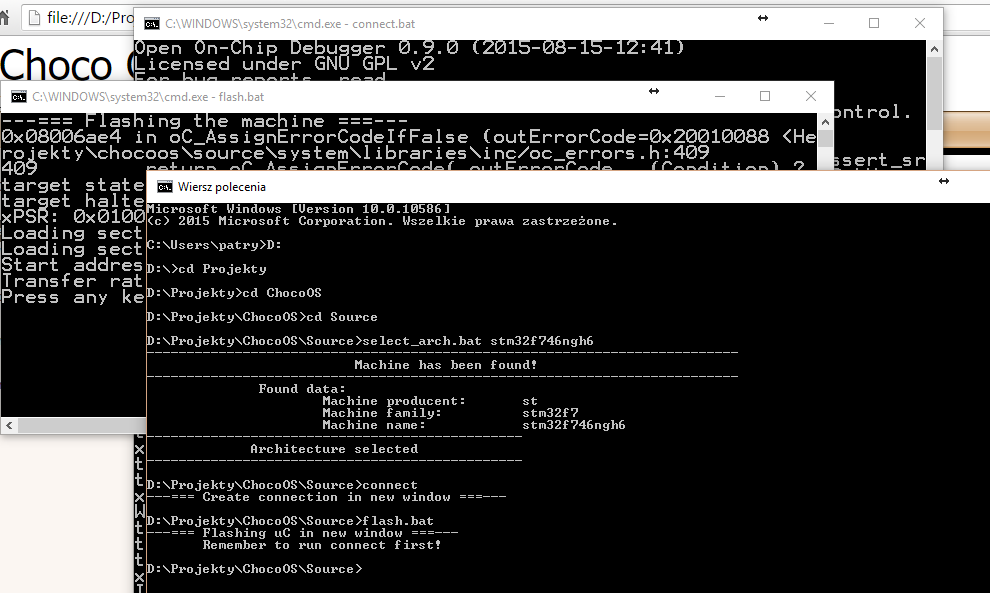
Flashing windows
If this operation will be success you should get message in flash.bat window with informations about Transfer rate and Start address.
Linux
Linux support is not ready yet, sorry :(
UART converter pins connection
When you are able to flash the chip, we can connect to the system. As I mentioned earlier we will use for this a UART converter. Before it, we have to connect the board with converter. The list of pins used by the system you can find in the following directory:
ChocoOS\Source\system\config\stm32f746ngh6
As you probably noticed, there is the target name in the path (stm32f746ngh6). There is separate directory for each supported target. It does not contain all configurations files, but only these, that should be specific for the selected target. More informations about configuration you will find in the configuration training. Anyway, in this case we will need to look at the file named oc_pinsmap.h. Inside, you will find these lines:
ADD_PIN( UART_RX , PC7 ) \
ADD_PIN( UART_TX , PC6 ) \
This is what we are looking for - names of pins, where the UART is connected. Remember, that you should connect it crosswise to the converter: Rx to Tx and Tx to Rx. In the documentation of STM32F7 Discovery Board you can find pins output. In this case it is D0 and D1:
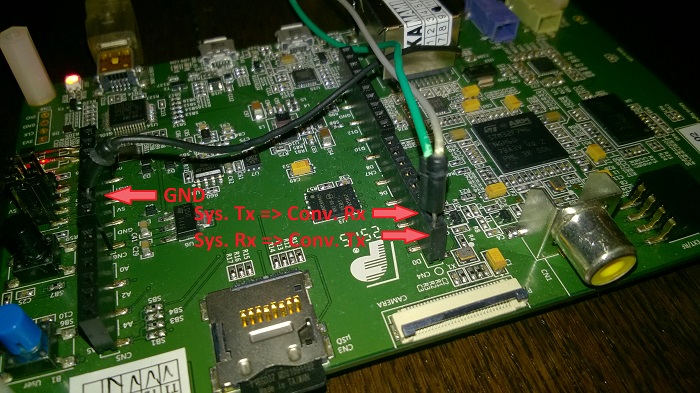
UART Pins Connections
Remember, that you also have to connect GND signal and make sure that all connections are correct.
PuTTY configuration
In this example we will use the PuTTY as a terminal for the system. You should connect the converter to the PC and run the PuTTY app. You must configure only 3 fields here:
- Connection Type as Serial
- Serial Line to COM[x], where the X is line of your UART converter (you can check it in the control panel)
- Speed to 921600 - this is a bit rate of the transmission. It can be always changed and checked in the configuration file (The BitRate field):
ChocoOS\Source\system\config\oc_streams_cfg.c
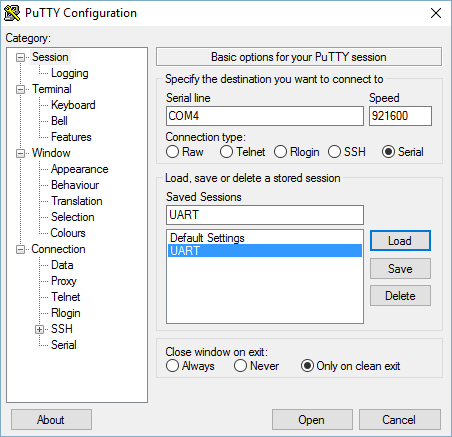
PuTTY Configuration
- Note
- It is recommended to also configure PuTTY character set translation to "Use font encoding" option. Thanks to that you will see correct borders in the terminal GUI.
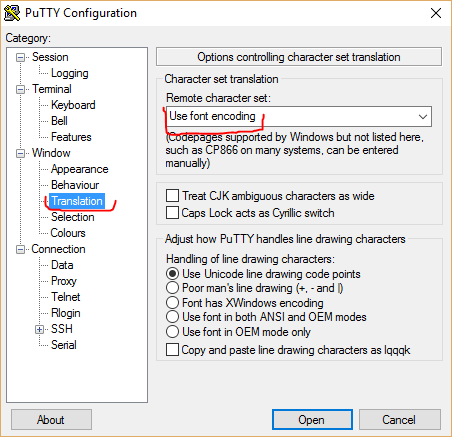
PuTTY Font Encoding
Now just click Open and wait a while (max 10 sec). You should see following screen:
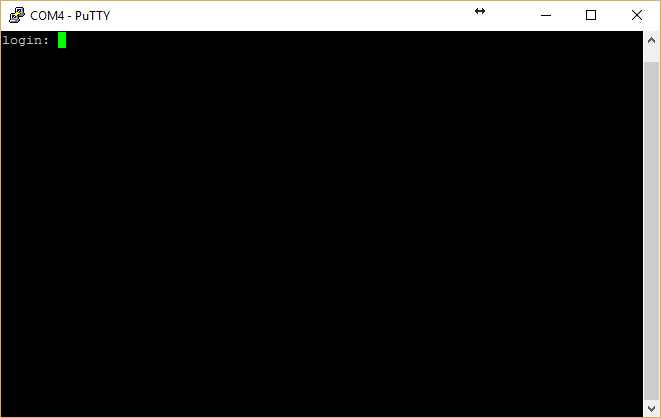
Login Form
If you didn't see it, firstly try to reset the board, and again - wait a while. If it does not help, here is list of possible problems:
- Some converter-board connection is not correct
- You typed wrong Serial Line number in PuTTY configuration
- The microcontroller was not flashed correctly
- Note
- If the system prints something, but printed text is not correct, the transmission speed is set to wrong value in the PuTTY configuration. Check it again and restart the PuTTY.
Remember - if it does not work, it is more than sure, that you have one of the problems above.
Step 2. First glance at terminal
Login and password by default is "root". Please type it, you will see terminal, and welcome message:
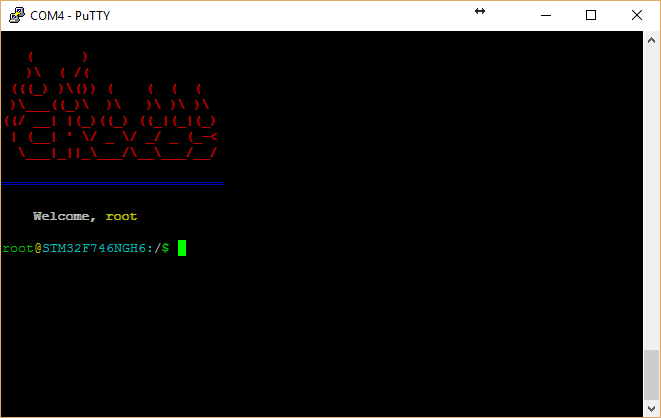
Welcome Message
Program Memory
If you type the "memory" command in the chell, you will see the program for showing memory informations, such as:
- RAM or ROM size,
- Usage of memory
- Memory alignment
- And sizes of few sections
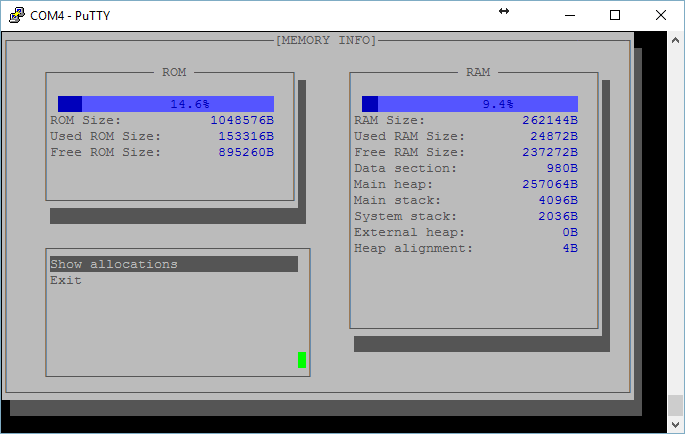
Memory Program
But more important thing hides under the "Show Allocations" menu. It's here, where you can see list of allocated memory. There is not a way to allocate memory in the ChocoOS without specify "Allocator" that describes module requesting for. It is very useful to find a memory leakage.
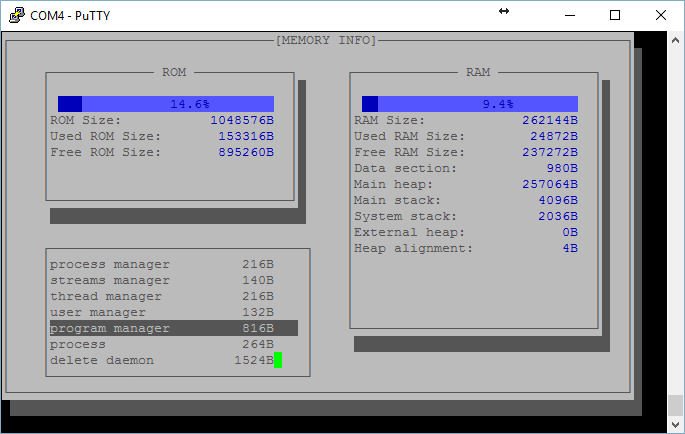
Memory Allocations
Program System
To get informations about the system, you type "system" command in the chell. You can see here:
- version of the system
- build date and time - you should note, that it is not a release date, but only compilation date
- also here you can find CPU Architecture
- and time of system startup
Moreover the program allows for showing system logs and errors. These can be cleared by choosing a "clear" options.
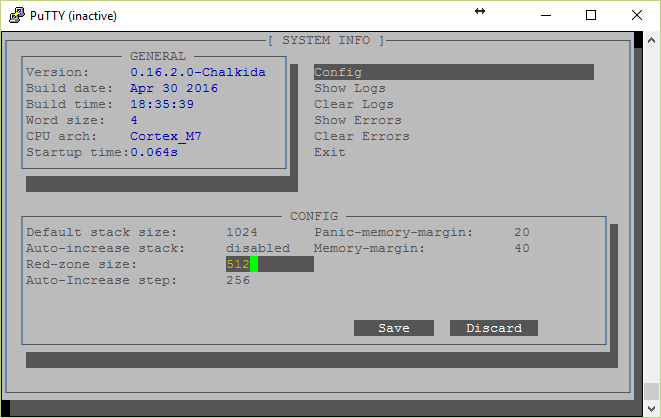
System Program
In the "Config" menu you can change some system configuration such as:
- size of a default stack - it's just size of stack for new threads, when it is not given
- enable automatic stack increase option. It is a mechanism for automatically detecting size of the stack, but note that this is not fully reliable way and you should avoid usage of it. It should be treated as additional protection against overflow of the stack.
- The red zone size determines size of the memory, that is reserved for each thread as additional emergency stack. When the basic stack is exhausted, the system uses a memory reserved as the redzone.
Step 3. Write your first "Hello World!"
Let's write our first program - "Hello World". It will use the STDOUT for print "Hello World!". The program will be included to the CORE space (for more info please look at the system architecture - for now it is not important) and will be stored in the "user" directory.
Generate a template
First of all we have to generate empty program files. We will use for that the script "newprogram". Please type command in the ChocoOS source directory (Windows Command Prompt):
newprogram HelloWorld 1024 CORE USER
The HelloWorld will be name of the program and 1024 is a size for main thread stack. The argument CORE determines layer of architecture. It can be set to values CORE or USER. The last argument allows to choose if the program should be stored in the system or user directory.
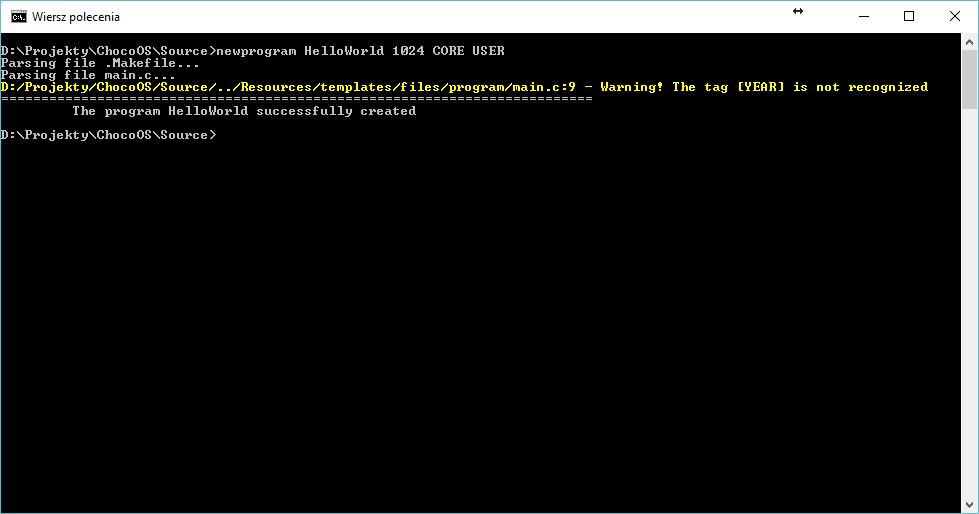
Hello World Generation
Now you can open the Source/user/programs path and look at the generated files stored in the Hello World directory. Please, open it - you should see 2 files: makefile and a source file called main.c.
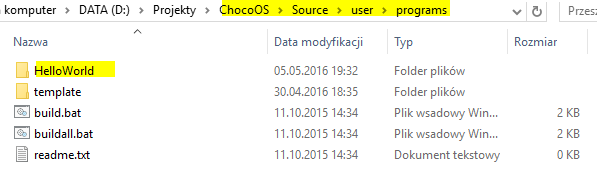
Hello World Files
Edit source file
The file called main.c is the program main file. It is included by default. To add more program files, please edit the file Makefile. Now open the main.c file and add message as in the example below.
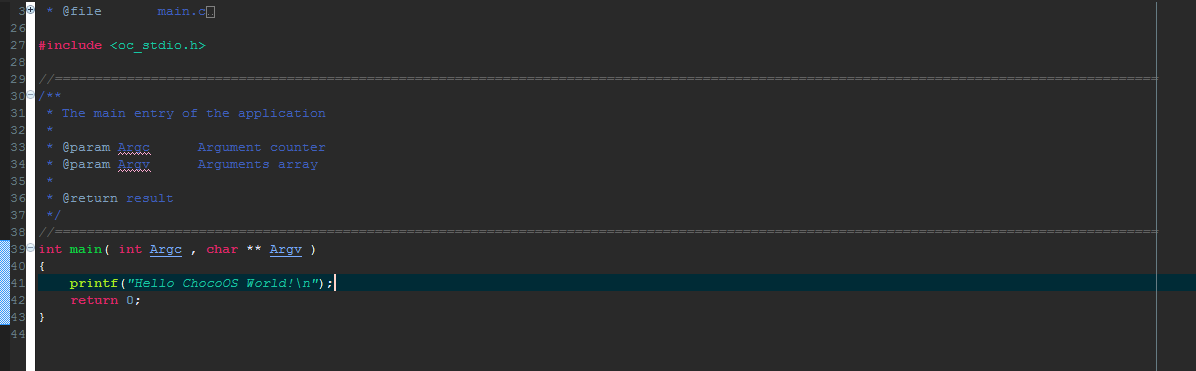
Hello World Source File
Adding Hello World to programs list
Ok, now the program is almost ready. You just have to add it to programs list. To do it open the oc_programs_list.h file (it is stored in the config directory), and add your program to the list:
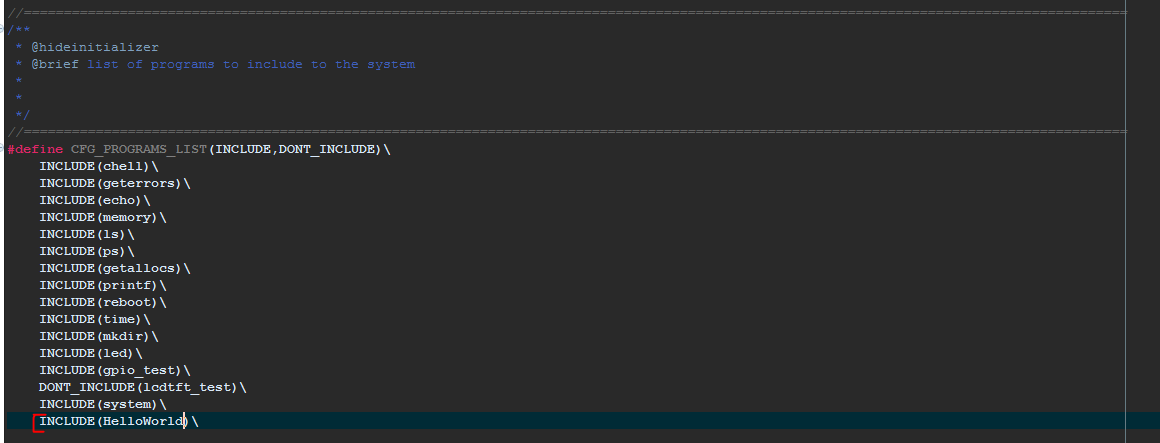
Adding program HelloWorld to programs list
Your hello world program is ready to run! You have to compile the system and write the image to the microcontroller like in the previous step: Step 1. Let's run the system! Now type HelloWorld command in chell, and enjoy!
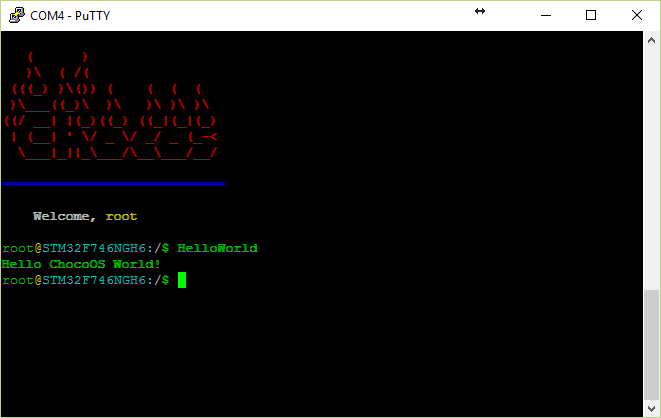
Hello World Run
Step 4. Usage of Terminal GUI
In one of previous steps, you should see programs "memory" and "system". These programs uses the TGUI - Terminal GUI Module module to display simple GUI based on VT100 terminal commands. In this step we will prepare a simple program, that will look like as follows:
Concept Preparation
First of all we have to prepare concept of the program GUI. It will be simple:
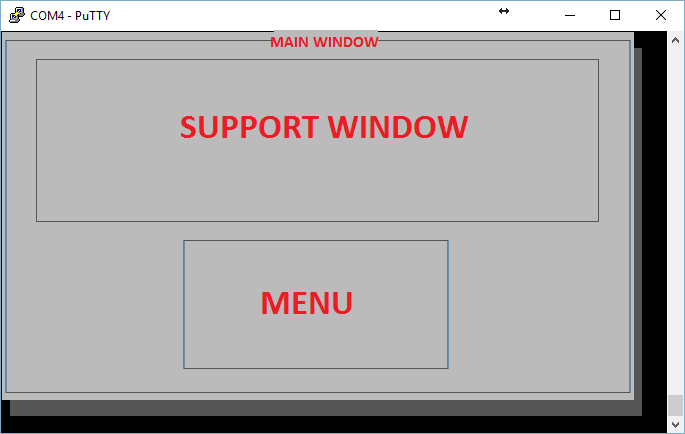
Program Concept
Now we should define a structure, that will store informations about our concept:
typedef struct
{
struct
{
} MainWindow , Menu , SupportWindow;
Main Menu
Now we have to think what exactly we want to display. For the example app we need 3 menu entries:
- Kitchen
- Bathroom
- Living Room
And one additional entry for closing the program - Exit. Let's start from the main function. First of all we have to reset terminal. It erases a screen, restores default console attributes and sets the cursor position to top left corner. After that we are ready to show main menu screen - for clearance we implement it as the function named ShowMainScreen. At the end of the function we have to restore default terminal state - just by reseting a device.
int main( int Argc , char ** Argv )
{
ShowMainScreen();
return 0;
}
The function for showing main screen is quite simple. It draws the box titled as My Home Manager and calls the function for showing main menu. Please take a look at the code and after that we describe it.
static void ShowMainScreen( void )
{
oC_TGUI_DrawBox(
"[ My Home Manager ]" ,
NULL , Screen.MainWindow.Position , Screen.MainWindow.Width , Screen.MainWindow.Height , &Screen.BoxStyle);
ShowMainMenu();
}
The prototype for the oC_TGUI_DrawBox function is like follows:
As you can see it takes few parameters:
- Title is a pointer to a string with title. It is obligatory.
- TextInside is a pointer to a string with text to put inside. It is optional and we dont need it, that's why we set it to NULL.
- TopLeft is a structure with position of the top left box corner
- Width and Height are just size of the box
- Style is a pointer to the structure that stores colors of parts of the box
As you can see, the function requires pointer to the box-style structure. We have to add it to the our global Screen_t structure. At once we put into also the styles for the other TGUI components (these will be needed in the following steps). So now the Screen_t structure definition looks:
typedef struct
{
struct
{
} MainWindow , Menu , SupportWindow;
Of course we also have to add declaration of the Screen variable. Let's define it as constant to save some RAM memory:
.MainWindow = {
.Position = { .Column = 1 , .Line = 1 } ,
.Width = oC_TGUI_DefaultScreenWidth ,
.Height = oC_TGUI_DefaultScreenHeight ,
} ,
.SupportWindow = {
.Position = { .Column = 10 , .Line = 4 } ,
.Width = 60 ,
.Height = 10 ,
} ,
.Menu = {
.Position = { .Column = 18 , .Line = 15 } ,
.Width = 42 ,
.Height = 5 ,
} ,
.BoxStyle = {
.ShadowStyle.DontDraw = true ,
} ,
...
};
To read more about style types, look at the TGUI - Terminal GUI Module module description. Now look at the ShowMainMenu function:
static void ShowMainMenu( void )
{
{ .
Title =
"Kitchen" , .Help =
"Manage kitchen" , .Handler = ShowKitchenMenu , .Parameter =
NULL , .OnHoverHandler =
NULL , .OnHoverParameter =
NULL } ,
{ .Title =
"Bathroom" , .Help =
"Manage bathroom" , .Handler = ShowBathroomMenu , .Parameter =
NULL , .OnHoverHandler =
NULL , .OnHoverParameter =
NULL } ,
{ .Title =
"Living room" , .Help =
"Manage living room" , .Handler = ShowLivingRoomMenu , .Parameter =
NULL , .OnHoverHandler =
NULL , .OnHoverParameter =
NULL } ,
{ .Title =
"Exit" , .Help =
"Exit the program" , .Handler =
NULL , .Parameter =
NULL , .OnHoverHandler =
NULL , .OnHoverParameter =
NULL } ,
};
}
The function draws the main menu. As you can see it uses the oC_TGUI_DrawMenu function, that takes a pointer to menu entries array. We had to define it and fill it with data for each menu entry we want to display. In addition we also added the Exit menu entry, that's handler is set to NULL - thanks to that the oC_TGUI_DrawMenu function will break, when it will be selected. In each other case, the function set as the handler will be executed, and after that the function will wait for the press of the new key.
Active Objects
In the last step we'll show how to use active objects. For this purpose we'll define the ShowKitchenMenu function, that is called, when the Kitchen menu is selected. Take a look at the function code:
static void ShowKitchenMenu( void * Parameter )
{
uint32_t selectedIndexes[]= { 1 , 1 , 0};
char enabledLightBuffer[100];
{
.Type = oC_TGUI_ActiveObjecType_SelectionBox ,
.Position = { .Column = Screen.SupportWindow.Position.Column + labelWidth , .Line = Screen.SupportWindow.Position.Line } ,
.Width = valueWidth ,
.LabelPosition = { .Column = Screen.SupportWindow.Position.Column , .Line = Screen.SupportWindow.Position.Line } ,
.LabelWidth = labelWidth ,
.LabelStyle = &Screen.LabelStyle ,
.LabelText = "Electricity:" ,
.SelectionBox.SelectedIndex = &selectedIndexes[0] ,
.SelectionBox.Options = EnabledDisabledStrings ,
.SelectionBox.NumberOfOptions =
oC_ARRAY_SIZE(EnabledDisabledStrings) ,
.SelectionBox.Style = &Screen.SelectionBoxStyle ,
.SelectionBox.OnChangeHandler =
NULL ,
.SelectionBox.OnChangeParameter =
NULL ,
} ,
{
.Type = oC_TGUI_ActiveObjecType_SelectionBox ,
.Position = { .Column = Screen.SupportWindow.Position.Column + labelWidth , .Line = Screen.SupportWindow.Position.Line + 1} ,
.Width = valueWidth ,
.LabelPosition = { .Column = Screen.SupportWindow.Position.Column , .Line = Screen.SupportWindow.Position.Line + 1} ,
.LabelWidth = labelWidth ,
.LabelStyle = &Screen.LabelStyle ,
.LabelText = "Main Light:" ,
.SelectionBox.SelectedIndex = &selectedIndexes[1] ,
.SelectionBox.Options = EnabledDisabledStrings ,
.SelectionBox.NumberOfOptions =
oC_ARRAY_SIZE(EnabledDisabledStrings) ,
.SelectionBox.Style = &Screen.SelectionBoxStyle ,
.SelectionBox.OnChangeHandler =
NULL ,
.SelectionBox.OnChangeParameter =
NULL ,
} ,
{
.Type = oC_TGUI_ActiveObjecType_SelectionBox ,
.Position = { .Column = Screen.SupportWindow.Position.Column + labelWidth , .Line = Screen.SupportWindow.Position.Line + 2} ,
.Width = valueWidth ,
.LabelPosition = { .Column = Screen.SupportWindow.Position.Column , .Line = Screen.SupportWindow.Position.Line + 2} ,
.LabelWidth = labelWidth ,
.LabelStyle = &Screen.LabelStyle ,
.LabelText = "Cooker:" ,
.SelectionBox.SelectedIndex = &selectedIndexes[2] ,
.SelectionBox.Options = EnabledDisabledStrings ,
.SelectionBox.NumberOfOptions =
oC_ARRAY_SIZE(EnabledDisabledStrings) ,
.SelectionBox.Style = &Screen.SelectionBoxStyle ,
.SelectionBox.OnChangeHandler =
NULL ,
.SelectionBox.OnChangeParameter =
NULL ,
} ,
{
.Type = oC_TGUI_ActiveObjecType_QuickEdit ,
.Position = { .Column = Screen.SupportWindow.Position.Column + labelWidth , .Line = Screen.SupportWindow.Position.Line + 3} ,
.Width = valueWidth ,
.LabelPosition = { .Column = Screen.SupportWindow.Position.Column , .Line = Screen.SupportWindow.Position.Line + 3} ,
.LabelWidth = labelWidth ,
.LabelStyle = &Screen.LabelStyle ,
.LabelText = "Timeout for enabled light [s]:" ,
.QuickEdit.Buffer = enabledLightBuffer ,
.QuickEdit.BufferSize = sizeof(enabledLightBuffer) ,
.QuickEdit.InputType = oC_TGUI_InputType_Digits ,
.QuickEdit.SaveHandler=
NULL ,
.QuickEdit.Style = &Screen.QuickEditBoxStyle ,
} ,
};
memset(enabledLightBuffer,0,sizeof(enabledLightBuffer));
strcpy(enabledLightBuffer,"15");
oC_TGUI_ClearPartOfScreen(Screen.SupportWindow.Position,Screen.SupportWindow.Width,Screen.SupportWindow.Height,Screen.BoxStyle.InsideStyle.Background);
}
The Active Object is an object that handles user interaction, such as: button, edit box, etc. If you'll show all objects by a oC_TGUI_DrawActiveObjects function, it will also handle transition between them. Each definition of the active object must consist of:
- Choosing type of the object (the Type field in the oC_TGUI_ActiveObject_t structure)
- Setting the object Position
- Setting size by filling Width and Height fields
- Filling the type-specific fields (like QuickEdit or SelectionBox)
One of object, that we want to display is:

Selection box example
To create it, we firstly need an array with options strings:
static const oC_String_t EnabledDisabledStrings[] = {
"disabled" ,
"enabled" ,
};
Now, we can take a look to the example code, there we have (comments inline):
{
.Type = oC_TGUI_ActiveObjecType_SelectionBox ,
.Position = { .Column = Screen.SupportWindow.Position.Column + labelWidth , .Line = Screen.SupportWindow.Position.Line + 1} ,
.Width = valueWidth ,
.Height = 1 ,
.LabelText = "Main Light:" ,
.LabelPosition = { .Column = Screen.SupportWindow.Position.Column , .Line = Screen.SupportWindow.Position.Line + 1} ,
.LabelWidth = labelWidth ,
.LabelStyle = &Screen.LabelStyle ,
.SelectionBox.SelectedIndex = &selectedIndexes[1] ,
.SelectionBox.Options = EnabledDisabledStrings ,
.SelectionBox.NumberOfOptions =
oC_ARRAY_SIZE(EnabledDisabledStrings) ,
.SelectionBox.Style = &Screen.SelectionBoxStyle ,
.SelectionBox.OnChangeHandler =
NULL ,
.SelectionBox.OnChangeParameter =
NULL ,
} ,
The quick edit box is very similar, just with a difference, that instead of filling SelectionBox, we have to fill QuickEdit field:
{
.Type = oC_TGUI_ActiveObjecType_QuickEdit ,
.Position = { .Column = Screen.SupportWindow.Position.Column + labelWidth , .Line = Screen.SupportWindow.Position.Line + 3} ,
.Width = valueWidth ,
.LabelPosition = { .Column = Screen.SupportWindow.Position.Column , .Line = Screen.SupportWindow.Position.Line + 3} ,
.LabelWidth = labelWidth ,
.LabelStyle = &Screen.LabelStyle ,
.LabelText = "Timeout for enabled light [s]:" ,
.QuickEdit.Buffer = enabledLightBuffer ,
.QuickEdit.BufferSize = sizeof(enabledLightBuffer) ,
.QuickEdit.InputType = oC_TGUI_InputType_Digits ,
.QuickEdit.SaveHandler=
NULL ,
.QuickEdit.Style = &Screen.QuickEditBoxStyle ,
} ,
After preparation of the array with active objects, we can draw it:
The function will end when the user will press ESCAPE key. Then we need to clear part of the screen, where objects were shown.
oC_TGUI_ClearPartOfScreen(Screen.SupportWindow.Position,Screen.SupportWindow.Width,Screen.SupportWindow.Height,Screen.BoxStyle.InsideStyle.Background);
Code of the Application
Here is the code of the application:
typedef struct
{
struct
{
} MainWindow , Menu , SupportWindow;
static const oC_String_t EnabledDisabledStrings[] = {
"disabled" ,
"enabled" ,
};
.MainWindow = {
.Position = { .Column = 1 , .Line = 1 } ,
.Width = oC_TGUI_DefaultScreenWidth ,
.Height = oC_TGUI_DefaultScreenHeight ,
} ,
.SupportWindow = {
.Position = { .Column = 10 , .Line = 4 } ,
.Width = 60 ,
.Height = 10 ,
} ,
.Menu = {
.Position = { .Column = 18 , .Line = 15 } ,
.Width = 42 ,
.Height = 5 ,
} ,
.MenuStyle = {
.Border.DontDraw = true ,
} ,
.BoxStyle = {
.ShadowStyle.DontDraw = true ,
} ,
.LabelStyle = {
} ,
.SelectionBoxStyle = {
} ,
.QuickEditBoxStyle = {
.ActiveBorder.DontDraw = true ,
.NotActiveBorder.DontDraw = true ,
} ,
};
static void ShowKitchenMenu( void * Parameter )
{
uint32_t selectedIndexes[]= { 1 , 1 , 0};
char enabledLightBuffer[100];
{
.Type = oC_TGUI_ActiveObjecType_SelectionBox ,
.Position = { .Column = Screen.SupportWindow.Position.Column + labelWidth , .Line = Screen.SupportWindow.Position.Line } ,
.Width = valueWidth ,
.LabelPosition = { .Column = Screen.SupportWindow.Position.Column , .Line = Screen.SupportWindow.Position.Line } ,
.LabelWidth = labelWidth ,
.LabelStyle = &Screen.LabelStyle ,
.LabelText = "Electricity:" ,
.SelectionBox.SelectedIndex = &selectedIndexes[0] ,
.SelectionBox.Options = EnabledDisabledStrings ,
.SelectionBox.NumberOfOptions =
oC_ARRAY_SIZE(EnabledDisabledStrings) ,
.SelectionBox.Style = &Screen.SelectionBoxStyle ,
.SelectionBox.OnChangeHandler =
NULL ,
.SelectionBox.OnChangeParameter =
NULL ,
} ,
{
.Type = oC_TGUI_ActiveObjecType_SelectionBox ,
.Position = { .Column = Screen.SupportWindow.Position.Column + labelWidth , .Line = Screen.SupportWindow.Position.Line + 1} ,
.Width = valueWidth ,
.LabelPosition = { .Column = Screen.SupportWindow.Position.Column , .Line = Screen.SupportWindow.Position.Line + 1} ,
.LabelWidth = labelWidth ,
.LabelStyle = &Screen.LabelStyle ,
.LabelText = "Main Light:" ,
.SelectionBox.SelectedIndex = &selectedIndexes[1] ,
.SelectionBox.Options = EnabledDisabledStrings ,
.SelectionBox.NumberOfOptions =
oC_ARRAY_SIZE(EnabledDisabledStrings) ,
.SelectionBox.Style = &Screen.SelectionBoxStyle ,
.SelectionBox.OnChangeHandler =
NULL ,
.SelectionBox.OnChangeParameter =
NULL ,
} ,
{
.Type = oC_TGUI_ActiveObjecType_SelectionBox ,
.Position = { .Column = Screen.SupportWindow.Position.Column + labelWidth , .Line = Screen.SupportWindow.Position.Line + 2} ,
.Width = valueWidth ,
.LabelPosition = { .Column = Screen.SupportWindow.Position.Column , .Line = Screen.SupportWindow.Position.Line + 2} ,
.LabelWidth = labelWidth ,
.LabelStyle = &Screen.LabelStyle ,
.LabelText = "Cooker:" ,
.SelectionBox.SelectedIndex = &selectedIndexes[2] ,
.SelectionBox.Options = EnabledDisabledStrings ,
.SelectionBox.NumberOfOptions =
oC_ARRAY_SIZE(EnabledDisabledStrings) ,
.SelectionBox.Style = &Screen.SelectionBoxStyle ,
.SelectionBox.OnChangeHandler =
NULL ,
.SelectionBox.OnChangeParameter =
NULL ,
} ,
{
.Type = oC_TGUI_ActiveObjecType_QuickEdit ,
.Position = { .Column = Screen.SupportWindow.Position.Column + labelWidth , .Line = Screen.SupportWindow.Position.Line + 3} ,
.Width = valueWidth ,
.LabelPosition = { .Column = Screen.SupportWindow.Position.Column , .Line = Screen.SupportWindow.Position.Line + 3} ,
.LabelWidth = labelWidth ,
.LabelStyle = &Screen.LabelStyle ,
.LabelText = "Timeout for enabled light [s]:" ,
.QuickEdit.Buffer = enabledLightBuffer ,
.QuickEdit.BufferSize = sizeof(enabledLightBuffer) ,
.QuickEdit.InputType = oC_TGUI_InputType_Digits ,
.QuickEdit.SaveHandler=
NULL ,
.QuickEdit.Style = &Screen.QuickEditBoxStyle ,
} ,
};
memset(enabledLightBuffer,0,sizeof(enabledLightBuffer));
strcpy(enabledLightBuffer,"15");
oC_TGUI_ClearPartOfScreen(Screen.SupportWindow.Position,Screen.SupportWindow.Width,Screen.SupportWindow.Height,Screen.BoxStyle.InsideStyle.Background);
}
static void ShowBathroomMenu( void * Parameter )
{
}
static void ShowLivingRoomMenu( void * Parameter )
{
}
static void ShowMainMenu( void )
{
{ .
Title =
"Kitchen" , .Help =
"Manage kitchen" , .Handler = ShowKitchenMenu , .Parameter =
NULL , .OnHoverHandler =
NULL , .OnHoverParameter =
NULL } ,
{ .Title =
"Bathroom" , .Help =
"Manage bathroom" , .Handler = ShowBathroomMenu , .Parameter =
NULL , .OnHoverHandler =
NULL , .OnHoverParameter =
NULL } ,
{ .Title =
"Living room" , .Help =
"Manage living room" , .Handler = ShowLivingRoomMenu , .Parameter =
NULL , .OnHoverHandler =
NULL , .OnHoverParameter =
NULL } ,
{ .Title =
"Exit" , .Help =
"Exit the program" , .Handler =
NULL , .Parameter =
NULL , .OnHoverHandler =
NULL , .OnHoverParameter =
NULL } ,
};
}
static void ShowMainScreen( void )
{
oC_TGUI_DrawBox(
"[ My Home Manager ]" ,
NULL , Screen.MainWindow.Position , Screen.MainWindow.Width , Screen.MainWindow.Height , &Screen.BoxStyle);
ShowMainMenu();
}
int main( int Argc , char ** Argv )
{
ShowMainScreen();
return 0;
}


 1.8.11
